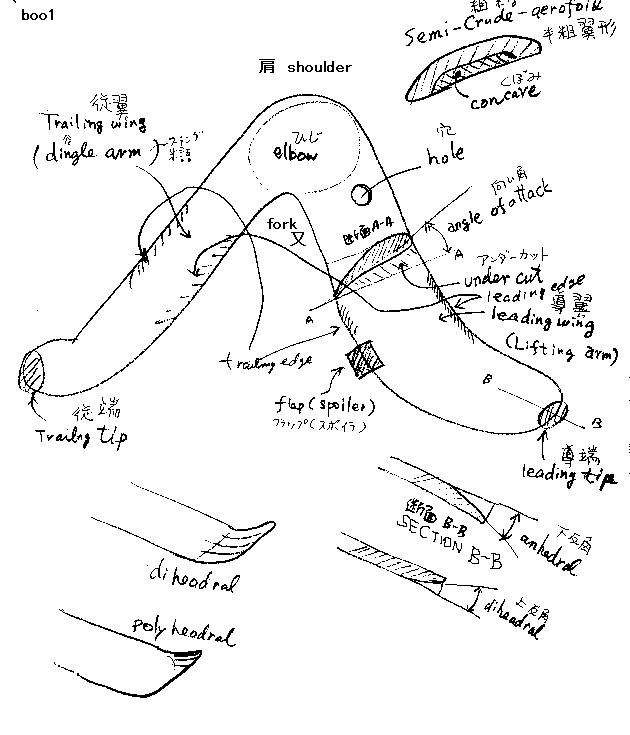
Fig.1
Flying Principle of Boomerang .....ブーメランの飛行原理(日本語は下半分をご覧ください)
Forward
Every our Japanese Engineer who went to Sydney for their business buy the Boomerang on the gift shop on the Sydney airport. After returning to their home, they try to return flying the boomerang on his neighbor park. But everybody fails to get beautiful returning, and he feels it was only decorative gift shaped like a boomerang. But I am not such a person. I looked hundred of boomerangs on ten of gifts shops in Sydney airport and city inside. And after returning to Japan I made about 30 of boomerangs with plywood board. And after many trial and study on the homepage of Australia Boomerang Association, I got beautiful returning and 8 shaped returning with my hand made boomerangs. With my trial I got some know-how and some new idea of explaining the flight of boomerangs. So I added my homepage about it here.
1. Definition of each part of Boomerang. Notice: Some of these ward definitions are differ from them of Australian Boomerang Association.
Fig.1
2. The definition of the wards indicating the
movement of Boomerang. Notice: They also includes some of my original definition.
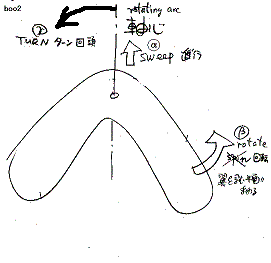
Fig2
Sweep: The ward,sweep indicates the changing the position of the whole boomerang. Any part of the same one boomerang sweeps for the same direction with the same speed in any one moment. So the sweeping velocity vector in any part of the boomerang is the same in any one moment. It is also understood as the movement of the Gravity center or rotating center (We can consider the gravity center and rotating center is near enough so can say same position here).
Rotation: Boomerang rotates around its rotating center anytime while it flies. Right hand boomerang rotates counter clock wise seeing from right side. In normal L shaped boomerang, the rotating velocity vector of the leading arm and the trailed arm differ 90 degrees. Rotating velocity on the rotating center is Zero. It is definition of the Rotating center.Rotating center of boomerang is not in the elbow. It exists on the fork, I looked it. I calculated and tested by hanging my boomerang, also gravity center of the boomerang No49 is on the fork.
Turning: Turning head indicates the change of the direction of the rotating arc. In this ward head indicates upper part of the rotating arc ( We call upper arc of gyro as head in Japan). Please image the skate player spinning on the ice and turning head (Innerbauer).
2. Boomerang flies by the lifting force (lift) get on the wing.
2.1 Air flows by the wing while Boomerang sweeping and rotating. It causes lift force on the wing and it make fly the boomerang.
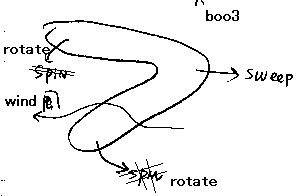
Fig3
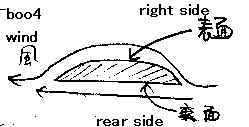
Fig4
2.1 Boomerang is made by after cutting plywood by jigsaw, scraping the both edge of the same one side. Scraped edge is called as right side. And another flat side is called as rear side. Do not call the right side as upper side, because boomerang is thrown by standing position. See fig 4. Wind flowing right side (this case upper side) flows long way than the air on rear (Lower in this case) side. So the air flowing right side is extended and it causes the decrease of the pressure of right side and cause the lift force,hanging up the boomegang. It is called as Bernoulli’s principle.
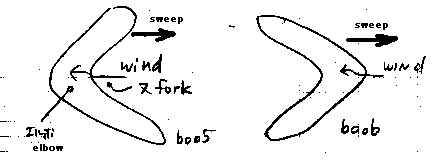 Fig5
Fig5
2.2 The direction of the air attacking the wing changes in every moment.
See Fig5 Left(boo5)! Wind attacks the fork and it folws to elbow part of the wing. See Fig5 Right(boo6)!
Wind attacks the shoulder and it flows to elbow part of the wing. Such
a way the wind blows to the wing from many different directions in each
second. So we should shape the wing as it can get the lift force with any
direction of wind. So we should shape the wing as mountain shape.
2.3 As the wind attacks the wing with the gathered velocity
vector of sweeping velocity and rotating velocity, and rotating velocity is not
so strong enough as extinguish the sweeping velocity, wind flows with many direction
to the wing, except two tips of each the wings. This situation is the same with
Frisbee. So we can say that “Boomerang is Frisbee”.
2.4 If you are Japanese, you will associate the Bamboo-Helicopter other than Frisbee as the fling toy. If you are Foreigner, Please buy the Bamboo-helicopter in the gift shop on the Narita airport as the Japanese traditional flying toy.
In Bamboo-Helicopter case, the rotating velocity is strong enough to cancel
the sweeping velocity. So it can be shaped as normal propeller having the
attack angle. In Boomerang case only the two tips of each wing can be understood
as rotating, so we can scrape the rear side of the wing to make undercut,
and get the attach angle only on the tips of two wings. But this attack
angle increase the lift force of the tip of the wings and boomerang can
get unneeded turning movement. And it can have a habit to fly like screw
opener indicated in Figure 30. You should know that it is difficult to
use this attack angle correctly.
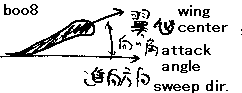
Fig8
3. Macro-motion of Boomerang
3.1 Boomerang makes "Cone motion" in it's first 3/4 circle
3.1.1 Preparing of the Preliminary experiment
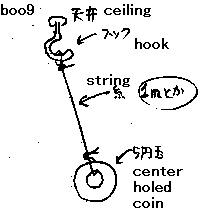 Fig9(Left): (Fig10 under)
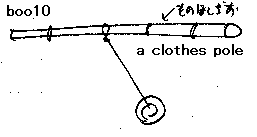
Please tap the hook on the ceiling and connect the 1m string on the hook. bundle the center holed coin like Japanese 5 yens in another side of the string. This material is called as cone pendulum. If you can not get center holed coin, use 10mm nut! If your house is tall and you can not reach the ceiling, please attach the string on the clothes pole like fig 10! And push a coin in many different directions in many different manners. This is preliminary experiment of Boomerang motion.
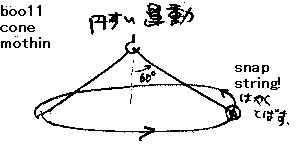
fig13
3.1.2 Hold a coin to make (angle between (vertical line from hook) and the string) becomes about 60 degrees. Push a coin on the direction in the (horizontal plane including coin) and 90 degree from the string, strongly. The track of the coin becomes circle. And the remaining image of the string may be cone. This motion is the biggest and first motion of the boomerang who traces cyclic track and returns to the thrower.
3.1.3 Turning head motion of Boomerang
fig14
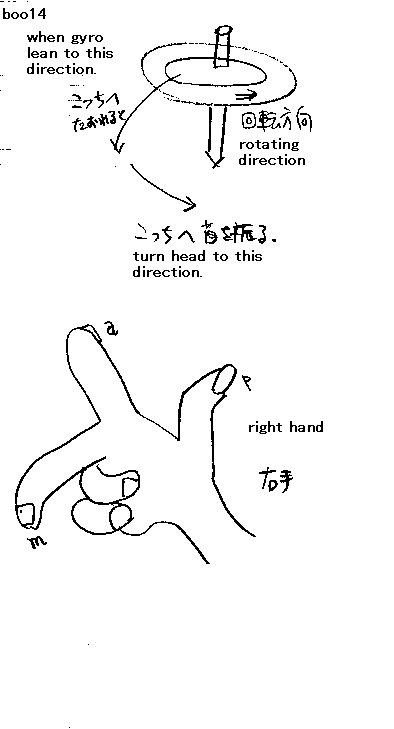
It is well known that flying boomerang behave like a gyro and make motion of turning head. See fig 14! When (the gyro rotating counter clock wise) begin to lean to left side of the figure, it turns the upper side of the rotating arc (head) to come to near side of this figure. To indicates this phenomena more universally, I want to explain each direction with right side hand. When head of (CCW rotating) gyro turns from thumb (p) to forefinger (a), the gyro get the magic force to be turned to middle finger (m) direction by the ghost of Coriori.
3.1.4 First 3/4 track circle of correct boomerang
Fig15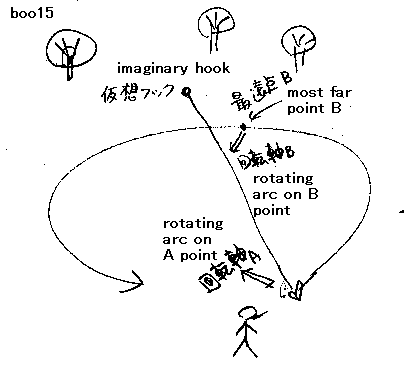 : Do not only look this figure but do it your self with your fingers! Arc
A is your Thumb. Arc B is your point finger.
: Do not only look this figure but do it your self with your fingers! Arc
A is your Thumb. Arc B is your point finger.
So boomerangs rotating arc be your middle finger.
Fig16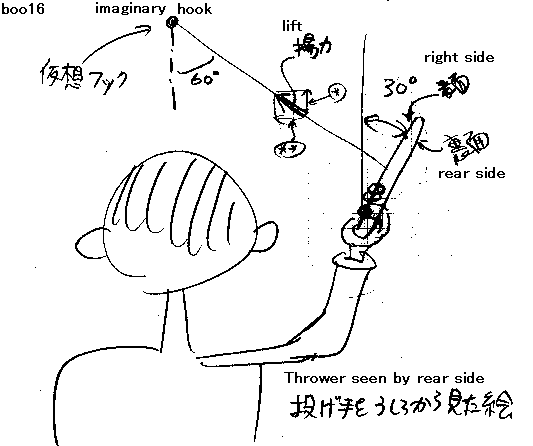
Let you grip the boomerang on your right hand as you grip the hummer. Hold it over the shoulder. Incline the right side of boomerang for outer side to your right about 30 degree and The right side should be inner to allow you to see the right side of your boomerang..Throw it front side with 20 degree upwards. The 30 degree of inclination is not so common. You should search for the best angle match to your boomerang. Then thrown boomerang get the lift force for the right side(face) of it (It be left side of sweeping direction). The vertical component of lifting force (* marked in Fig16) resist to the gravity working for the boomerang from the earth, caused by the agreement by Mr. Newton and the God of Apple on 100 years ago. The horizontal component of the lifting force (** marked in Figure 16) becomes introversive force that makes boomerang to trace the circle. With this way, boomerang trace the same way with cone motion. While making the cone motion, the boomerang turns his(her?) head to counter clock wise. By the gyroscopic precession, the boomerang turns his head to upper side from inner left side. The boomerang return to the thrower like figure 15 faceing the head to upper side and he has almost vertical lift force and lost introversive force, and continues to change his movement to next 8 letter motion.
Sorry! Before talking about 8 letter motion, I want to say about Pendulum
motion.
3.2 Pendulum motion of Boomerang (This motion is not expected motion but
occers ofenly)
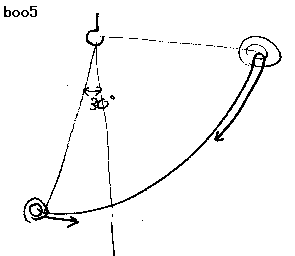
Fig10
3.2.1 Hold the coin to make the string angle about 30 degrees with vertical line. Push the coin for the direction to the vertical arc of hook strongly! Then coin climb up to another side and after lost the speed, it will falling down for the direction just to your fingers. This motion is not intended to get with boomerang. But it occurs sometimes. The boomerang return back to your side very high speed and it is danger to play with.
3.2.2 Even if the boomerang was made correctly, we can get such a track
by throwing boomerang with horizontal wing (with keeping the rotating arc
vertically from the ground), like Figure 11. And even if the inclination
of the boomerang is correct, when thrown with the too much sweeping velocity,
the boomerang get into this motion after following half of the circle motion.
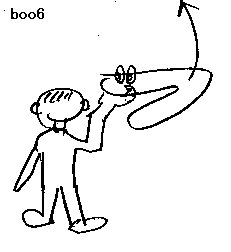
Fig11
3.2.3 The wrong made boomerang can not get into the circle motion and get to this pendulum motion easily. Then boomerang act as vertical jumper. I will explain in detail how we can avoid making such a “vertical jumper”. In my experiment the boomerang made with aspect rethio (rethio of length of the wing and width of the wing) within 4 or 5 must be this type. I will talk agin how to avoid this motion later.
3.3 8 letter (Eight letter) motionk (Hovering)
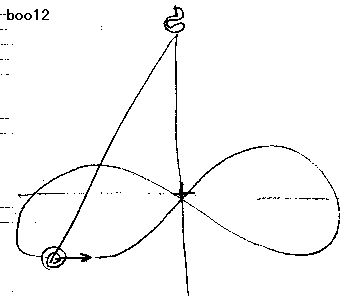
Fig12
3.3.1 The left side figure 12 is un realistic. Coin hanged on the hook do not trace on 8 letter motion. But Boomerang can do. The boomerang on the position on the coin on Figure 12 is inclined slightly (5degrees) left side and move forward. So he get introversive force to left and change the sweeping direction to left side. So he gets gyroscopic precession and rotating arc becomes vertical when he go just vertical downside of the hook on + position on the figure 12. After he go through + position, the inertia of gyroscopic precession remains and he begin to incline to right side. So he begin to turn to right side and trace the right side half of 8 letter in figure 12. And so on.
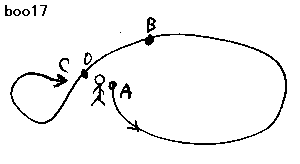
3.3.2 While making 8 letter motion, boomerang lost the sweeping speed little by little and stop the position by rotating and get the just vertical lifting force there. This situation is called as hovering. But you can see the Hovering is one type of 8 letter motion with smallest sweep speed. See figure 18! After making cone motion (circle motion) from A to B position of Figure 18, boomerang returns back to the thrower by making S- letter motion as half of 8- letter motion, from B point to C point in Figure 18.
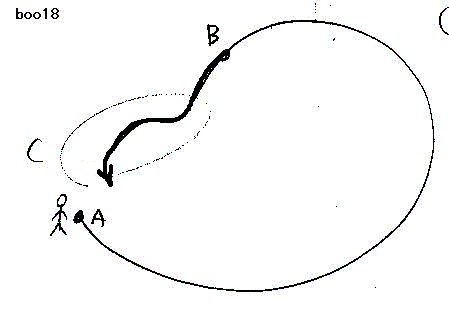
Fig18(left): Fig19 (lower): Please image wind come from left side of these
two figures.
3.3.3 By throwing boomerang with a little less sweeping speed than last
case, Boomerang ends the circle motion a little nearer then last case,
and it fly by the thrower making there the cross point of the 8 letter
motion. See Figure 19(boo17)! In this case the whole track of the boomerang
becomes 8 letter tracks. And sometimes the same thing happens with a little bit stronger wind and
also with throwing more initial rotation.
4. Rocket boomerang motion (additional explanation to 3.2.2) In this case
rocket is not mean A4 but Me163,raketen fluegzeug.
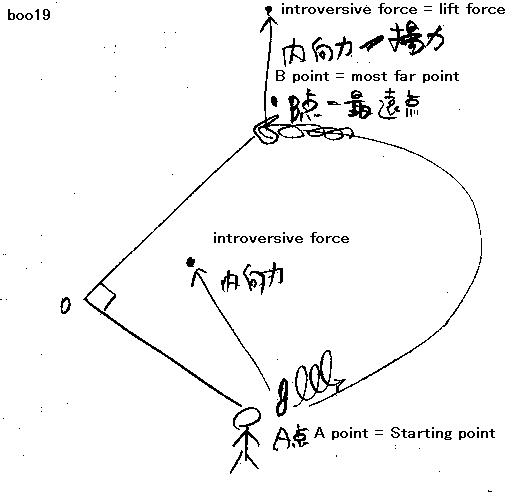
Fig19
4.1 Please image the boomerang was thrown
the best manner indicated in figure 16! The thrown boomerang goes through the
circle track as a bottom of cone motion from A point of the Figure 19 to the most
far point B in the figure 19. The vertical line of the traffic (track) changes
from A-O to B-O while boomerang make running half of the whole circle. By
changing the angle of the arc of the rotation about 90 degree or more, the head
of rotating arc is waked up about 90 degree by gyroscopic precession. So
boomerangs rotating arc becomes just vertical when he comes B point. So from B
point boomerang stars to move as pendulum motion in figure5 and starts vertical
rise up motion indicated in figure20. This page indicates how to move out from
this devil cycle.
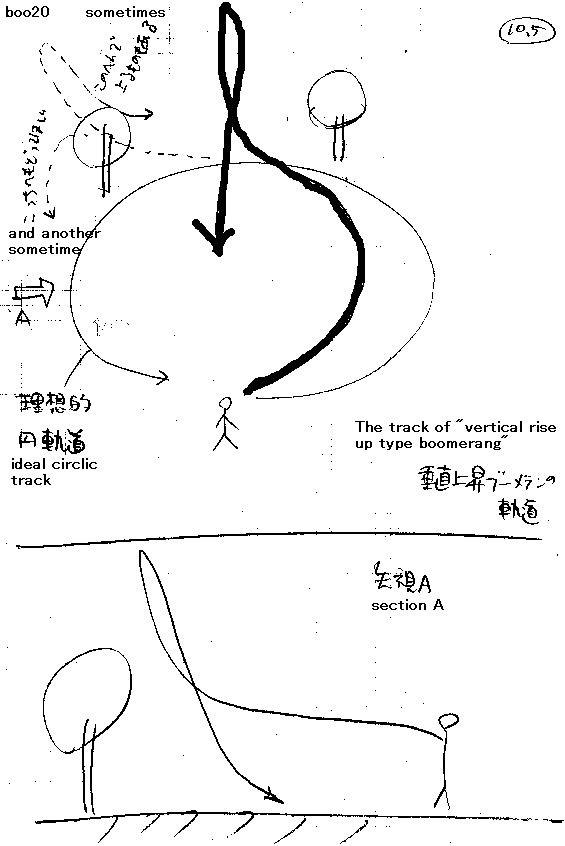
Fig20
5. How to make returning boomerang
You can make returning boomerang by reducing the effect of the gyroscopic
precession. See the figure 19 once again! If (the turn of the head of the
boomerang becoming vertical) delays from B point for more later point as
3/4 circle or 4/5 or more, and (on the the turning head point) the sweeping
speed has reduced enough, and it is near from thrower, the circle shaped
returning will be proceeded. I had prepared the two help men to delay the
gyroscopic precession effect for you.
5.1 Help man No1: "Resisting force for turning head of the wing "

Fig21
Hold the Japanese bamboo flap keeping the main flat part of the flap horizontally! Push it on the air with rotating the flap! The flap will fly about 10m by keeping its flat face horizontally and landing on the floor smoothly. You can be the winner of the office if you throw it with 5 degree lower side and push flap handle strong forside.Because the flap has very big flat face, this face resists to be changed its included plane and has a habit to move inside of the same one plane. Because the boomerang is also made with flat plywood, he has a habit to move inside of one plane. this effect can delay the change of the head direction caused by gyroscopic precession. With this meaning we can say that"Boomerang is bamboo flap".
5.1.2 The resisying force of the flap changes while rotating the boomerang
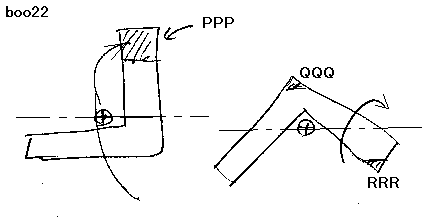
Fig22 Sorry please image each boomerang sweep to left direction. And (+)
point means the rotating center. Horizontal line means the turning arc.
Clock wise arc means the turning head motion.
Because the boomerang rotates while it flies, the shape of the boomerang anti air is changing second by second. In the timing one wing faces long to the sweeping direction (like PPP on the left figure of figure 22), the tip of the wing has big resisting effect to turn the rotating arc (head). By the other hand, like right figure, in the timing of both wings can not take long arm from the sweep direction, the most far points of the wing from the turning arc indicated with QQQ and RRR in the figure are not so far from the turning arc. So in this timing boomerang has weak resisting force for the turning head force.

5.1.3 To cover this weak point, we must make the boomerang bigger and the length of the wing should be extended. But when we make the boomerang bigger, not only resisting force but also rotating inertia itself be bigger and gyroscopic precession itself also be bigger. In order to escape from this devil circle, we should cut out the part of the wing around the arc of rotating in the timing of weakest timing of the boomerang. See lower figure! The shape of the Admirals hat has a effective plan view shape whitch has effective resistance force for head turning in weak timing. And you cam understand that to make "fat" AAA,BBB and CCC aria is also effective to get strong turn head resistance.
Fig23 Horizontal line in this figure maens turning arc.
5.1.4 Scissors angle
See the Fig22! You can understand the Boomerang can be increased its resisting
force to turn head by taking more narrow scissors angle. My best boomerang
No49 has 85 degree.
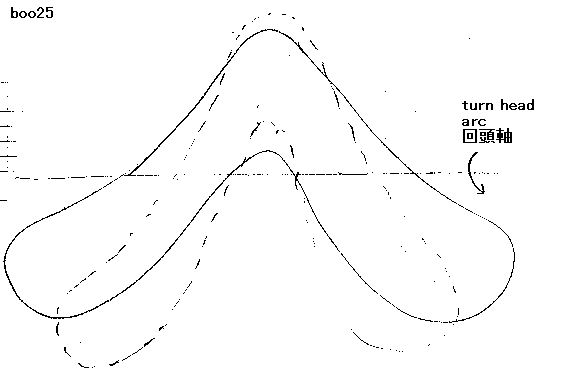
Fig25
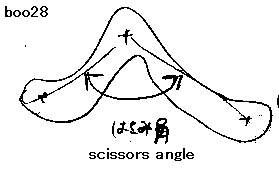
Fig28
5.2 Help man No2 "Upper wing priority effect"
5.2.1
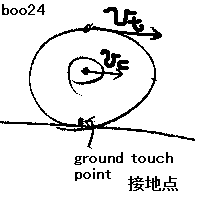
Fig24
Please image movement of a tire of the car! The point touching the ground
has no velocity. The center point of the wheel has the same speed of the
car itself (Ve of figure 24 is same with "meter speed"). So the
upper tip of the tire has double high speed of the Car (Vt=Ve*2).
5.2.2
Fig26

Fig27
The Boomerang thrown from the hand flies like a wheel tire by keeping it’s rotating arc almost horizontally for a while. So upper wing cut the air with high speed and generates bigger lift force (Lu on fig 27), while lower wing generates smaller lift force (Ll on figure 27). With this difference of the lift force, the rotating arc (Head) of the boomerang is rotated to counter clock direction and it resists the gyroscopic precession who want to turn the rotating arc to clock wise. This effect become bigger when the boomerang has long wing (high aspect ratio).
5.2.3

Fig29
In order to get more strong this “Upper wing priority effect”, make the polyhedral undercut on the front tip of each wings by scrape the rear side of the wing. How to shape it, please see Fig 1!
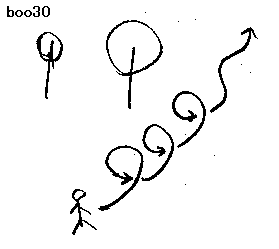
Fig30
5.2.4 But dont forget that to use this polyhedral undercut is very difficult. I looked 100 of boomerangs in Sydney airport but only one type had this shape and the undercut was only 0.5mm. Because the tip of each wings cut the air very fast, the attack angle of the wing generates very big lift. So boomerang with this undercut tends to have too big counter clock wise turning habit and he sometimes makes “cork screw trace” given in figure 30.
6. Advice
Like I tolled you in this home page, Boomerang can return to you when he made properly (Hard), and he was thrown properly (Soft), and he got proper wind (Lucky). So the making and throwing boomerang is very fan hobby for the middle aged Engineer like me. I can spend the time with boomerang talking with the goast of Coriori, Newton and Bernoulli.
I bought the 4mm thick plywood board in neighbour "Do it youself shop". In Japan we can not get airplane plywood cause we have never made airplane with plywood like English made mosquito.
You should not hit your boomerang to children. But you have no need to care about dogs.
You should take a clothes pole with you when you go to the park to fly
the boomerang to rescue the boomerang from the tree.
Also you should take an used undershat to wipe the boomerang.
7. My best boomerang No49
Copy this shape on the “BMP” software in your computer. Print it with proper zoom to be the distance of tips of two wings be 290mm. Attach the printed paper to the tick paper with paper grew. Cut it with paper cutter. Put this “shape paper” on the 4mm plywood. Trace the shape with pencil. Cut the shape with jigsaw. With small knife, scrape same one side whole around the boomerang. You should make it sure that the all section be the shape like Fig4. Smoothen all around with #120 paper. Coat with Urethane. After coating has dried up, rub with #400 paper few times. ( Try wing length with 330 and 240mm.) (This type do not need any polyhedral undercut)
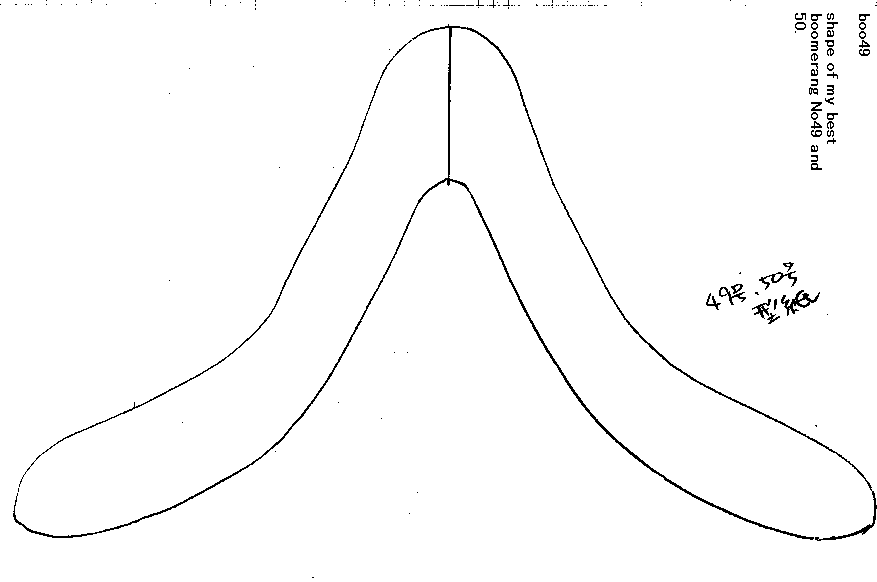
Fig49
8. Two Hypothesises by JF1OZL
8.1 Hypothesis 1: Boomerang is supplied the rotating force from the air by flying.
Fig50
The Trace of tip of the wing is far longer than the trace of the elbow,
till the boomerang returns after thrown. So I feel rotating inertia should
be reduced earlier than sweeping inertia. But the fact is not that way.
When Boomerang returns to me, he continues to rotate while his sweeping
speed has become almost zero. I feel that boomerang must get some supplement
of rotating energy while it flies. How he gets? I asked it to my boomerang
and he taught me the secret. Please see Fig50! In the instant Boomerang
flies on his fork to front of sweep direction, the air attacks on the upper
wing want to flow shortly over the wing surface and it is bent to upper
side (flow from P to Q on the figure 50).So boomerang has given the air
the upper vector force (alpha in the figure). So the boomerang get the
counter force from the air, just controversies vector from alpha. So boomerang
is pushed to counter clockwise direction by the air. Lower wing go through
with lower speed anti air. So lower wing get weaker effect of this.
Please see Figure 51, in this timing upper wing get clockwise direction force from the air, but in this case, air escapes around the shoulder and the smaller amount of the air flows on the upper wing than later case.
Fig51
********Additional description on Hypothesizes 1****2007/03/09*******
Please look the Figure boo501! This figure indicates the position 90 degree before the Boo50. In this figure, the air flow on the tip of the leading wing is twisted to upper side. So reaction of this effect gives the leading wing a down force. This down force makes the boomerang accelerate to rotate for counter clock wise. And also the wing flow over the trailed wing also assists to accelerate to rotate for counter clock wise.
Please look the figure 502! This figure indicates the position on 180 degree differ from the figure 501. On this position, the wing flow over the upper side of the boomerang is twisted to downward and upper ward. And it causes totally nothing.
As I showed you with the figure 50, 51 501 and 502, the situation of 50 and 51 have the effect to acceleration of rotation and deceleration, while only the position 501 has the effect of acceleration. So the boomerang should be accelerated of it’s rotation when the both wing be upper side.
In my experience the boomerang which has the leading wing's tip bent to inner side like the figure 503 could not make hovering when it returns to my head.
On the other hand, the boomerang which has the wings tip bent to outer side like the figure 504 could make hovering when it returns to my head. And you can understand that also the trailed wings tip bent to outer side also helps to accelerate the rotation of the boomerang. It looks like the Admirals hat, is not?
8.2 Hypothesis 2: The difference of gravity center and rotating center makes the boomerangs rotating speed change inside of each cycle. And it may cause the effect of work of the wings and helps the hypothesis 1? But I have no way to know this hypothesis is right or wrong.
And also this difference between gravity center and rotating center may cause the resistance for turning head force.
Buy a high spped camera and catch the change of the change of the rotating
speed.
Rent the wind tunnel and measure the force on each direction.
When you get the Doctor award please report me! I will say congratulation
and drink wine with me.
Fig-boo6002.gif
The second Hypothesis of the reason why the
boomerang can continue to rotate- Description add on
On last Sunday when I play with my
boomerang, one neighbor child rotated the boomerang around his pointing finger
like Figure Boo601. While looking him, I discovered that I had forgotten the
important theory of rotating. See Figure Boo602! Weight can continue to rotate
by the force given by finger through the string. The string can not transpose
any torque from the finger to the weight. The string can transpose only the
force with the direction from the gravity center of the weight to the grapping fingers.
The Force is indicated as F and it is called as introversive force. See Figure
boo603! The toy hoop rotating around the waist is called as Fla-hoop in
9. What No77(C-shape), No73 (Ohm-shape) and No75 (M-shape) taught me.
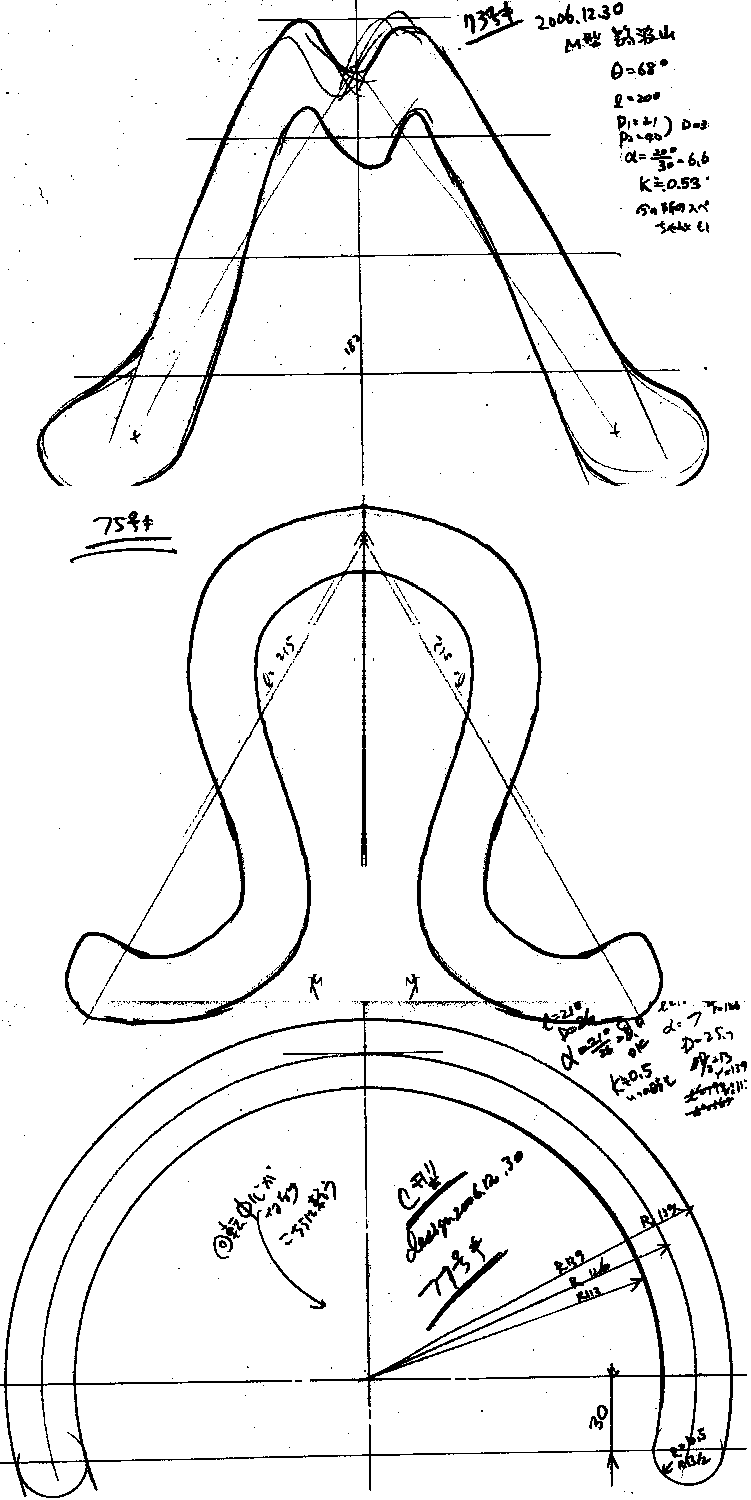
: In order to try how the various shaped boomerangs fly, I made these three boomerangs once a time. The result of these, tree were the same. They can trace about 3/5 of circle. But they can not do hovering. All these boomerangs have circle shaped plan view. So they have small radial wing which makes lift force in hovering. So they can not hover. I can not make how to evaluate about this point of view. But more simply I can say that the plan view shape which has big circumference part in wing (like O, C, M, Q and G) can not do hovering.
Requirement of the configuration of the boomerang
In this clause, I wrote about “How to make the boomerang.” Somebody says that “Boomerang can be made with any shapes.” But I feel “Good returning boomerang has some physical requirement on its shapes”. I wrote here about it.
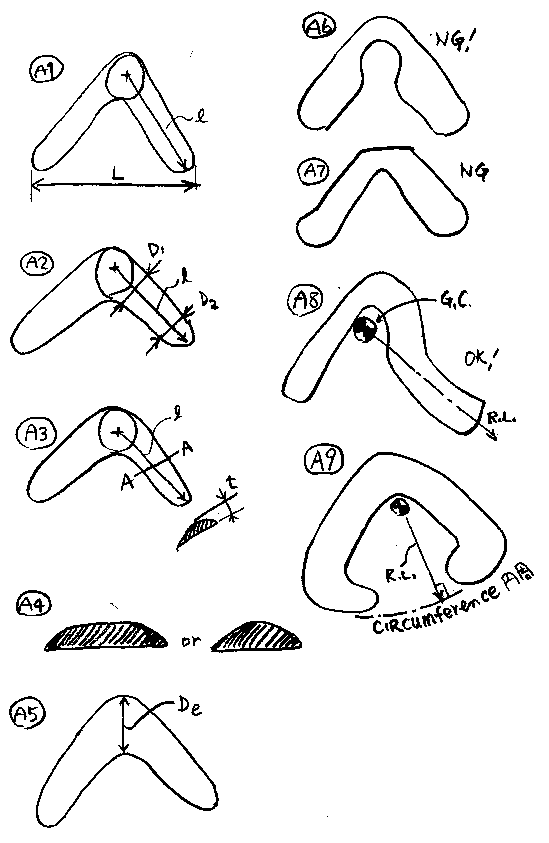
1. Thickness of the plywood board should be 3mm to 6mm. The 11mm board is too heavy to our normal adult man to throw. If you are young and can throw baseball with 140km/h speed gun, you can try 11mm plywood. 4mm thick is recommended.
2. Length of wing (small L of Figure A1) should be from 160 to 250mm. 200mm is recommended. So whole width (L of A1) becomes from 225 to 350mm. You may feel 200mm wing length is too small for your enjoyment. But this boomerang flies over 30m far from you and returns. Is it not enough to throw in your neighbor field?
3. Aspect ratio should be from 6 to 7. As aspect ratio 6.5 is recommended. In this home page I define the Aspect ratio as ratio wing length divided by averaged wing width. Aspect ratio=a. Wing length is small L of Figure (A2). Averaged wing width D=(D1+D2)/2…..See Fig (A2)!.....Small Aspect ratio (like 5.5) wing will be “Vertical jumper boomerang”, because it do not have enough turning resistance. And also small aspect ratio boomerang will be heavy to fly and not return to the thrower. On the other hand, the boomerang which has too big aspect ratio, like 9, can be thrown and return to the thrower. But it has tendency to be week to the wind and also week to hard landing.
4. Board thickness ratio. Here in this homepage, Board thickness ratio(i) is defined as the number of the thickness(t) of the board divided by the averaged wing width(D). I=(t/D)*100(%)....Board thickness ratio (i) is should be smaller than 18%. As Board thickness ratio, 12 to 18 % is recommended.
5. Wing section (aerofoil) should be simple mountain shape indicated in (A4). You should make new boomerang with such a simple shape once. And after you make trial thrown, you should add very few amount of undercut like 0.5mm on the wing tip.
6. You can make boomerang with any wood board. But it must be smooth out sided. It must have enough strength not to be broken when it make hard landing. Plywood is recommended.
7. Width of elbow (De of A5 figure) should be 30mm or more. This requirement is to keep the strength of hard landing.
8. Width of the elbow (De of Figure A5) should be wider than both wings or at least the same wodth. Also not to concentrate the stress, the wing shape like (A6) or (A7) are prohibited.
9. At least one wing should have its wing tip shape as radial direction from the gravity center of the boomerang. See Fig (A8)! The tip of the leading edge has its shape parallel with the radial line (R.L.) from the Gravity center (G.C.). When the boomerang remove from the hand, it goes away from the hand with its gravity center be far from the hand. So this shape helps to remove the Boomerang from the hand. By the other hand, the boomerang, which has two wings with circumference direction shape of the wing like figure A9, can not leave from the hand easy. It sometimes fails to be thrown. It sometimes makes hard crash on the ground by the foot of the thrower and be broken. You can throw the boomerang with holding leading wing or trailed wing (Not to say trailing wing!). So you should give this shape at least one wing of your boomerang.
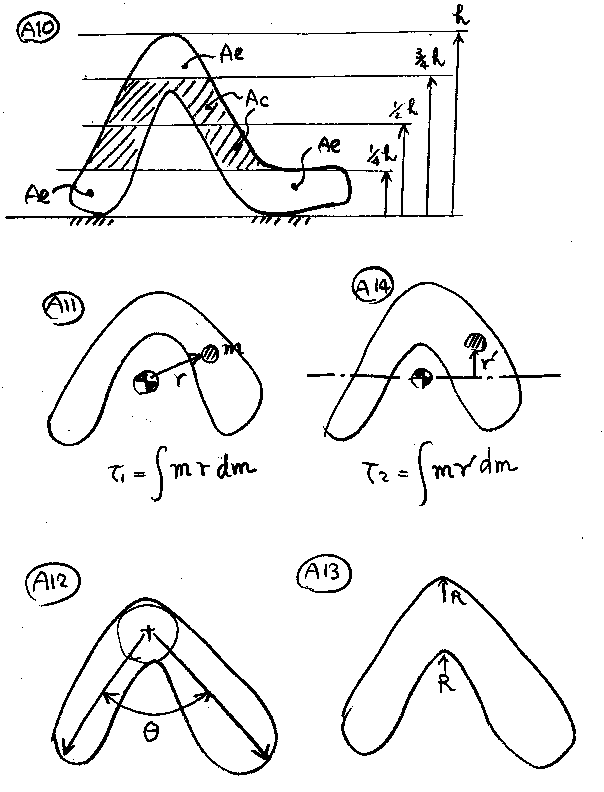
10. You should calculate the aria of the wing to have enough turn resistance
for gyroscopic precession. The strength of the gyroscopic precession depends
on the rotating inertia of the boomerang and it is calculated by the equation
indicated in the figure A11. The strength of the turn resistance is calculated
with the equation indicated in Figure A14. But to calculate these equations
are not so easy to do. So I can propose easy, simple way of it. When you
sketched the plan view of the boomerang, stay it on the paper on the horizontal
line like figure A10. The top of the elbow is set as height, h. Let you
line 3/4 h, 1/2 h and 1/4 h horizontally. The aria outer three part indicated
as Ae should be more than half of the total aria. So Ae should be bigger
than Ac. And if you feel your sketch is not enough, you should change the
shape to be slim up the Ac aria or you can make fat on the Ae aria.
11. Scissor angle, theta of A12 figure should be from 80 to 90 degree. As a scissor angle 85 degree is recommended.
12. Every round on the shape should be R=10mm or more. Not to wound your hand when you catch the boomerang. Not to be the air resistance, drag too big. Not to concentrate the stress when the boomerang makes a hard landing.
13.Desnsity of the boad. Density= 0.52(g/cm3) OK.
Density = 0.67 NG. It is my experience. I do not know about between 0.52
and 0.67. Please make 10cmX10cm squere boad and measure the weit of it
before you make boomerang! Do not forget to measure the thick!
You can understand the sold boomerangs also follows my proposed requirement.
Description add on 12th Feb 2007/// Proposal of Kaizen Admirals hat /// Boomerang need to be trimmed.
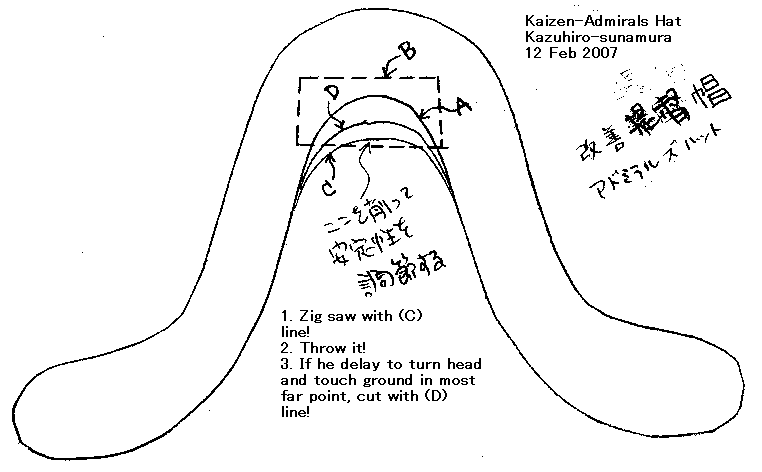 Boo93
Boo93
Please see the Figure Boo93! I down loaded this shape from the Home page of Australian Boomerang association. And I made two boomerangs with this shape. They flied very well with circle shaped trace. One of them was be broken on windy day. So I re-produced three boomerangs with the same shape. But All these re-produced boomerangs flied like Me163, indicated with Figure 20 as vertical hopper. I tried to add a paper tub to try to get better trace. Then I discovered that they can make circle trace with square paper attached like a shape (B) indicated in Figure 93. the width of paper was 30mm and the total length of the boomerang, L was 33cm. You can understand that this was caused to strengthen the resistance to be turned head effect explained in the clause 10. of The Physical Requirement.
In the process of the production of the boomerang many error is happens in the shape outline, weight of each part of plywood, cutting of the edge of wing and the smoothness of each part of the wing. So many reasons of error cause the difference of the trace of fling of the same type of boomerangs. Therefore in order to make good boomerang, it needs the trimming same as the tuning of IFT coil of radio receiver.
Please see the Figure 93 once again! I made three boomerangs with the shape of ( C ). One of them turn head too late and touch the ground on most far point. So I cut like shape (A). And it flied well. The second one indicated well trace with ( C ) line. So I stayed it. The third one could not fly up even after cut to (A) line, so I had broken it. Such a way I propose to make “The Admirals hat type boomerang with trimming tab on folk” indicated in figure 93. Please make it with 4 or 3 mm thickness plywood with the total length 33cm.
+++++++++++++++++++++++++++++++++++++
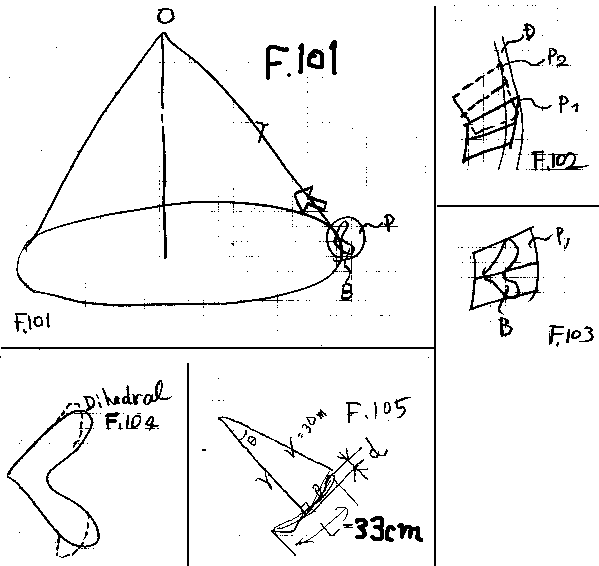
Additional description on Feb.22th 2007 This thinking came on my mind in the morning on Bank House Hotel Uttoxeter England, “The meaning of dihedral processing”.
Please see the Figure 101! Boomerang, B sweeps tracing the cone motion. The length of the hanging string is r. Center is O. The small plane including the boomerang is called as P. And P is defined as square shape. Figure 102 indicates the instant of the P has swept from P1 to P2. This boomerang traces the cone motion so the head is turning and the P1 and P2 is not in the same plane. So the total space including P1 and P2 has the thickness like D indicated on the figure 102. And the Boomerang must sweep while he mixing the air with thickness of D. Already you understood what I want to say. If the plane P is curved to upside like Figure 103, Boomerang can fly on the same curved plane, and total air resistance become very small. Yes, “Proper bend to upper side of the both wing chip reduces the air resistance while the boomerang do cone motion and it make it easier to come back of the boomerang”. With the pure geometrical calculation with the figure 105, the proper dihedral processing becomes 0.9075mm with boomerang who has the total length 33cm and turn with 30m radius. Yes it is very similar with my experience as proper dihedral processing, is not?
********************************
Description adds on 8th July 2007
When you visit your neighbor “Do it your self shop” to buy a wood plate to make boomerang, you may be felt as miserable by looking only the remaining winded plate. You should buy that! I say you that “Make your boomerang with rear side with mountain”. Once again I want to say you “Make your boomerang with rear side with mountain”. If you make your boomerang with this material, the boomerang laid upper side right side on the desk will work as seesaw. The boomerang laid upped side read side will be bridge on the desk, and you can push the center (I say elbow) of the boomerang with the 2mm stroke. Yes it is the most important secret of the boomerang. I was looking for this secret half years. --------------- What I say here is the secret of the secret. If you get some boomerang which do not return to you, you can recover that with this process. Pour the water on your boomerang about three minutes! Dry it on the sun shine with cramping on the frame on the window frame of your house. After half hours, you can get another boomerang.
******** Underside is Japanese letter *******
ブーメランの飛行原理
前書き:日本人の多くの技術者は、シドニーに出張に行くとお土産にブーメランを買ってきます。そして、家のそばの空き地で2〜3度飛ばして、「んーナンだ、ぜんぜん戻ってこないジャンか!」とか思ってそれでおしまいです。でも、私は違います。私は2006年10月(ISOTC127meeting)にシドニー空港で1時間搭乗待ちをする間に、50個程度のブーメランを見て、またその説明書を読んで、どうやって飛ぶのかを想像したうえで、日本にかえってから自分で作ってみました。だいたい30個ていどのブーメランを作った後、約1ヶ月の努力で理想とされるO軌道や8軌道のブーメランができたところです。ここにしめす私の薀蓄(うんちく)はその成果です。オーストラリアのブーメラン協会のホームページや日本の協会のホームページの記述も多いに参考にはなりましたが、私なりの言葉の定義や、考え方もいっぱい入っています。特に、ブーメランの基本的な運動が、円錐振り子であるというのは新説(この場合は原理の新説ではなく、説明のしかたというレベルの話)です。
1.ブーメランの各部をあらわす言葉の定義(私独自のものもあるので、他人と話する時は気をつけてください。ISOでブーメランのTC作りましょう!。)
図1.
2.ブーメランの運動を表す言葉の定義(私独自のものもあるので、他人と話する時は気をつけてください。)
図2
進行:ブーメラン全体がある方向に向かって進んで行くことを、進行と呼びます。私が投げる野球の球を、スピードガンで計ったことが昔(若い頃)ありましたが、野球の球が速度90km/h程度でしたから、まあブーメランもその程度の速度で進行しているんだと思います。
回転:ご存知のように、ブーメランは回転しながら飛んでいきます。私の推定計算では、初速において毎秒18回程度(翼長片側22cmの49号機で)回転します。1回の飛行が6秒程度ですので、1回の飛行で100回程度まわることになります。しだいに回転速度もさがるので、80回程度かもしれません。
軸心:ブーメランが回転する軸。図一ではわかりやすさのために、軸心は腕の真ん中に上下に書いてありますが、普通、私の観察では軸心は腕よりもはみ出して、又のなかの空虚な空間にあります。これを観察できるってことは、すなわち何度も頭の上を帰ってきたブーメランが飛んでるのを見たからです。
回頭:軸心が、進行方向に垂直で軸心を含む平面上の別な方向に、姿勢を変えること。(後で詳細説明します)
2.ブーメランは揚力を得て飛行する
2.1
ブーメランは、進行と回転の両方の運動によって、翼に風を当て、そのとき発生する揚力で浮き上がって飛んでいます。
図3,4
2.1ブーメランは、ジグソーで合板を型に切り取った後で、上から見て同じ側のすべての端っこを上から見て斜めに削り取って、だいたいの形を作ります。つまり、翼の断面でみると、翼の前側も後ろ側も上側が削られています。(すいません、説明がしつこくて。)すなわち、上側が凸の山形の断面形状でつくります。(そうじゃない場合もありますが、まずはそう思ってください。)ですから、ブーメランが風をきったときには、上側(おもて面)が空気が遠回りすることになるので、速く翼の表面を流れることになります。そのとき、速い流れは圧力が減るという「ベルヌーイの法則」によって、翼の上側の圧力が減るので、翼は上側に引っ張られることになり、これが揚力に成ります。翼は凸の側に(おもてがわ)にひっぱられます。
図5:boo56:上の図は左側に飛んでいるものと考えてください。
2.2 ブーメランに当たる風の方向はブーメランが回って、姿勢が変わるごとに、変化します。たとえば、図5の場合は、腕に対して風は又の方向から吹いてきます。一方、図6の場合には、腕に対して風は、肩のほうから吹いてきます。すなわち、腕に対してまったく違う方向から風が吹いてくるので、腕の辺りの断面形状は、どっちから風が吹いてきても、揚力が発生する「上に凸」形状が良いことになります。
2.3 実はおおよそ、翼端以外のすべての部分は、ある意味腕と同じ風の影響をうけるので、「両方向性」のある、「上に凸」形状が良いことになります。この例がフリスビーです。フィリスビーはすべての断面が一様にすべての方向からの風を受けるので、どの方向で切っても「上に凸」形状に成っています。この意味で「ブーメランはフリスビーである。」と言うことができます。
2.4 皆さん、日本人なら、回りながら飛ぶおもちゃとしてまず、ブーメランよりも先に、「竹とんぼ」を連想するでしょう。ただし、竹とんぼは斜めうえに飛ばして戻ってくるような動きもできますが、円を描いて戻ってくるような軌道はえがけません。。。。前置きが長くなりましたが、ブーメランも翼端だけは、横滑りはするものの、逆には運動しないので、一方通行の運動ですから、プロペラ形状に、裏側を削って、向かい角が着くように削って、竹とんぼのように揚力を得ることが可能です。すなわち、図8のように、翼の裏側を削って、大きな揚力を得ることが可能です。しかし、私もずいぶん失敗しましたが、翼端揚力の多き過ぎるブーメランは、理想的な円軌道を描かずに、「逆ねじワインオープナー」のような起動を描いて、全体としては、あっちへ飛んでいってしまい帰ってこないのです。ですから、まずはこの「翼短揚力はあまり頼ってはいけないもの」としての認識が必要です。
図8
3.ブーメランのマクロ運動
3.1 ブーメランは円錐振り子運動をする。(正しい円軌道ブーメランのはじめの3/4周)
3.1.1 予備実験の用意
図9
図10
図9のように、天井にフックをねじ込んで、そこに30cmから1m程度の長さの糸を結(ゆ)わいつけて、その先に5円だまなど、ちょっとした錘(おもり)を結わいつけてください。これが、円錐振り子です。天井が高くてとどかなければ、物干し竿に吊り下げて(図10)も結構ですし、あるいは、椅子の下でもいいです。まずは、あまり悩まずに、5円玉をいろいろな方向にはじいて運動の軌跡を観察してください。なにやってるかぜんぜんわからないと思いますが、これがブーメランの予備実験です。
3.1.2 そして、糸がフックの垂線に対して、60度をなすような角度に5円だまを位置してから、5円玉を含む水平面上でかつ糸と直角な方向に”強く”押し出してみてください。(図11)。。5円玉は、円運動をして、糸は円錐の軌跡を描きます。これが、ブーメランが円を描いて戻ってくる第一の主要な運動です。
3.1.3 ブーメランの首振り(回頭運動)
図13
図14
ブーメランが独楽(こま)と同じように首振り運動をすることはよく知られています。半時計方向に回転している独楽は、図13で左側へ倒れようとすると、実際には図で手前側に首をふります。この法則をもっと一般的な法則として書くと、右手の親指(p)の方向から、人差し指(a)の方向に外力で回頭されようとする独楽は実際には中指(m)の方法に、回転軸をもってくるものです。この方向の関係はいつも一定ですが、回転が逆になると逆に回頭します。
3.1.4 正しい円軌道ブーメランのはじめの3/4周
図15(右); 図16(下)
ブーメランは、右手でもち、肩の辺りに持ち上げて、山形になった表面を内側(投げる人から見える方向)にして、前方上側20度に投げます。このとき、図16のように、30度程度外側にやや寝かせて投げます。この30度という最適値は普遍的な数字ではなく、ブーメランの種類によって、10度から45度くらいまでいろいろです。ここで、回されながら前方へ投げられたブーメランは、表側に向けて(表面(おもてめん)に垂直な方向に)、揚力を得ます。この揚力の大地に対する垂直成分(上の図の*印)は重力と抗する力になります。一方、揚力の水平成分(上の図の**印)はブーメランを内側へと向かわせる内向力として働きます。この結果ブーメランは図15のように円錐振り子と同じ軌道を得ます。但し、このさいに、ブーメランは飛んでゆく方向が変わる結果、回転の軸の方向が曲げられて、その結果3.1.3で述べたように独楽の首振りと同じように回頭します。ですので、最初かなり立ててなげだされたブーメランは、図15のようにだいたい戻ってきた際には表面が上に向いて戻ってきます。それで、もはや、内向力が発生しないので、円運動をやめてそこで減速しながら、次のホバリング運動に移行します。
3.2 ブーメランの振り子運動(正しくないが良く発生するうごきかた)
図10
3.2.1 フックの垂線に対して30度の角度になるように5円玉を持っておいて、垂線に向かって強い力でブーメランを打ち出してみてください。すると、5円玉は垂線を含み地面に垂直な平面で急上昇して、やがて、初速の運動エネリギーがすべて位置エネルギーに変換されてしまうと、速度を失い、やがて重力に引き戻されて、すごいスピードで元のところに戻ってきて、指にあたるでしょう。こういう動きはブーメランにとって好ましくない運動ですし、だいたいものすごいスピードで落下してくるのであぶなくていけません。
3.2.1 正しくできたブーメランでも、投げるときに表側を垂直上側にして、図11のようにして投げると、こういう運動をします。また、最初の投げるときの角度は良くても、押し出す速度が大きすぎると、円の途中で水平姿勢になったときに、この運動モードに入ってしまいます。
図11
3.2.2 またよくできていないブーメランは、どういうふうに投げても、この「急上昇&降下タイプ」にしか飛行できません。じつはこのようなブーメランを作るほうが、正しく戻ってくるブーメランをつくるよりもたやすいのです。これについては4章で詳細説明します。
3.3 ブーメランの8の字運動(ホバリング)
図12
3.3.1 左の図12は正しい絵ではありません。フックにつるされた5円玉は8の字を描くような運動はできません。しかしブーメランにはできます。図の5円玉の位置にあるブーメランはやや半丸の内側(つまり進行方向左側)に傾いた、だいたい5度程度傾いた姿勢で飛んでいます。このとき、揚力の90%は重力にさからうように働き、揚力の垂直成分の10%程度がブーメランの軌道をを内側にむけて曲げる内向力として働きます。するとブーメランは図の位置からフックの垂直下の(+)点へとまがりながら向かいます。このときに、さきほど3.1.4で述べた回頭運動をするので、ブーメランの回転軸は(+)点では垂直になり、結果ブーメランの翼面は完全に地面と水平になります。この際に、回頭が(+)点ですんなり止まらずに、そのままつんのめってブーメランは逆に右側へ傾くので、図12の右側の半分を飛ぶ間今度は進行方向に対して右に傾いた状態で、右旋回をしてふたたび(+)点へ戻ってきます。あとはこの繰り返しです。
3.3.2 ホバリング
ブーメランは上記の8の字運動をしながら次第に進行する速度を風との摩擦抵抗で消費してゆき、最後には8の字がどんどん小さい8の字になって、やがてはその場で、完全に翼を水平にしたまま浮いている状態になります。これがホバリングです。ですから、8の字運動とホバリングは別な運動ではなく、限りなく小さな8の字運動がホバリングだと私は定義したいのです。実際よくできたブーメラン(50号機)でも、Sの字を目の前で描いて足元にかえってきたり、目の前で静止してホバリングしたり。頭の上を通り越して、頭の後ろで8の字を描いて後ろから足元に落ちてきたり、その違いはとても微妙でほんの少しの風と投げたときの力加減の違いのようです。
図18
3.3.2 正しく円軌道(0軌道)で戻ってくるブーメランにおいて、最初の3/4周、すなわち図18のAからB点までは、3.1.4で述べた円錐振り子の運動で、最後のBからCまでが3.3。1で述べた8の字運動の半分のS字運動でふらふらしながら戻ってきます。
図19
3.3.3 上記の0軌道の場合に対して、ホンノ少しブーメランの行き脚が速くて、投げた人に近いところで、円錐運動から8の字運動に移行した場合には、図19(boo17)のように、投げ上げ者を通り越してから8の字運動をするので、全体の軌跡が8の字になります。
4.垂直上昇ブーメランの運動(3.2.2に対して説明追加)
図19
4.1 さて、話は3.14まで戻ります。図16の理想的な投げ方で投げられたブーメランが、理想的な円軌道を描いて飛んだとしましょう。図19において、投げた人の位置A点から、最も遠い所(最遠点)ににゆくまでに、軌道の垂線A−OとB−Oはほぼ90度(かそれよりやや多い程度)かわることになりますから、そのままその回転軸の変化が回頭に影響するとなると、ブーメランはB点に来たときにすでに翼面が水平になってしまいます。すると、図19のB点のように、ブーメランを引っ張る揚力の糸は真上に来るので、そこからブーメランは3.2.1で述べた振り子運動に入ってしまい、結果として図20のような軌跡で落ちてしまいます。ブーメランを作ったひとは必ずこのようなものを作るものです。本書は「どうやってここから脱却するか」において、他者の追随を許さない考察をしています。
図20
5.ではどうやって「垂直上昇」せずに「帰って来る」ブーメランを作るか。
5.1 さきほど、4.1で述べたように、垂直上昇するブーメランの方が、むしろ当たり前のものなのです。ではどうやって「垂直上昇」せずに「帰って来る」ブーメランを作るかというと、図19でA点からB点にゆくまでに、ブーメランが回頭するのをおくらしてやって、図18や図19のくらいまで、すなわち最遠点でなく、円を3/4から7/8程度描いた後で、翼面が水平にもどるようにしてやればよいのです。そういう効果を持ったものがブーメランには2種類用意されています。ここでは仮にお助けマン1とお助けマン2と呼びましょう。次の章で詳細紹介します。
5.1 お助けマンその1「翼の回頭抗力」
5.1.1
図21
信用金庫で配られる、樹脂製の骨に両側から宣伝のプリントされた紙を張ったうちわを水平にして、回転させながら飛ばしてみてください。うちわは、その面を水平に保ったまま、10m程度とんで地面に落ちるでしょう。うちわは、その翼形が大変に平らにできているので、その平らな面を含む面以外の方向に対しては、大きな空力的な抗力を持ちます。同じ面の中で運動する癖があります。これによって、平らに作られたブーメランも、同じ平面の中で動こうとするので、結果として、ジャイロ効果によって発生する回頭運動を遅らせることができます。
5.1.2 翼の回頭抗力は姿勢で変化する
図22
ブーメランは大変に速く回転しているので、回頭力に対する姿勢が刻々と変化しながら飛んでいます。図22の左図の様に、どちらか片方の翼が、回頭力(図では矢印でしめされている)に対して、長手姿勢になった瞬間は、図の斜線で示した部分が回頭を妨げるので、大きな回頭抗力を得ています。一方、図22の右側の様に、回頭する力に対して両方の翼が同時に長いスパンを保てない姿勢に来たときには、回頭抗力が少ない姿勢になります。いくら有利な姿勢でガンバっても、不利な姿勢の時に回されたのでは全体として回頭抗力の大きなブーメランにはなりません。この場合は、「強み」を伸ばすよりも「弱み」の解決が優先だというきわめて日本的な問題解決パターンが必要です。
図23
5.1.3 この図22右の不利な姿勢を改善する方策は第一に全体の翼形を大型化してやればよいようなものですが、同時にそのままでは重くなってしまい、またそのぶん回転慣性が大きくなるので、回頭抗力が増加するのと同時に回頭力自体も増加してしまうので、もとのもくあみです。そのため、大型化しておいてから、回頭抗力に寄与しない、「不利姿勢での回頭軸」に近い部分、すなわち図23の斜線部分を削り取って(回頭抗力/回頭力)比率を大きくする翼形が必要です。そうですね。図23は、はやりの「アドミラルズハット:元帥帽子」の形状に近いですね。私の49号や50号もこの系列です。
5.1.4 翼の挟み角
図22の右側をみてもらうと判っていただけると思いますが、翼の挟み角(はさみかく)を狭くすると、翼短が、回頭軸から遠ざかるので、回頭抗力が増加します。私のブーメランは挟み角が84度と小さくできています。図25参照。
図25
図28
5.2 お助けマンその2「翼上優先効果」
5.2.1
図24
自転車のタイヤを思い描いてください。タイヤの中で、地面に接している部分は、なにしろ地面にへばりついていますから地面との相対的な速度はゼロです。タイヤの回転中心は、すなわち自転車の進行速度で移動しています。タイヤの最も上の部分は、その結果地面に対して自転車の進行速度の2倍の速度で動いています。信じられないかも知れませんが本当です。お持ちの自転車の前輪に対角線で反対側2箇所にシールテープかなんかで目印をつけて、目の前でゆっくり走ってもらい観察すればわかります。上の図では接地点の対地速度はゼロ。ホイール中心の対地速度はVe=車体の進行速度すなわちメーター速度。タイヤの上の端の対地速度Vt=Ve*2です。
5.2.2
図26
ブーメランも投げられたあとしばらくは、垂直に近い姿勢で回転しながら進行するので、自転車のタイヤと同じです。図26のように動きます。(すくなくとも円軌道の初めの1/4はこうです)その際、下の図27のように、翼の上側が対地速度が大きく、翼の下側が対地速度が小さいので、その結果、翼の上側の揚力(Lu)が下側の揚力(Ll)よりも大きな揚力を得ます。その結果、図27の点線矢印で示したように、ブーメランは進行方向に対して逆ねじ周りに回転される力を得ます。これが「翼上優先効果」です。この「翼上優先効果」は、正しくなげられたブーメランの3/4周の間、ずっと回頭力と反対の方向に作用するので、回頭を遅らせる働きをします。
図27
5.2.3
図29
この翼端効果を得るには、図29のように左右の翼の前側の先端の裏側を削って、翼の端っこにおいて向かい角(polyheadral
Undercut)をあたえるのが手っ取り早いです。
5.2.4
私がシドニー空港のお土産やで見たブーメランの内、何種類かはこのポリヘドラルアンダーカット(翼短裏側削りこみ)を与えたものでした。しかしこの「お助けマンその2」はうまく使いこなすのが難しいです。なにしろ翼端は対空速度が大きいので、ほんのちょっと削っただけでこの効果は大きく現れます。その結果、ブーメランは、図30のように、進行するにしたがって反時計回りの方向、すなわち「逆ねじ」方向に回りながら進行し、ちっとも帰ってこないまま落ちてしまいます。
図30
6.まとめ
以上述べたように、ブーメランの運動は大変に微妙で、うまくできた(ハード)ブーメランを、うまく投げて(ソフト)かつ、うまく風が吹いた(ラッキー)場合に、思い描いたような円軌道や8の字軌道が得られます。それゆえ、ブーメランは作るのも飛ばすのも面白く、法則性と偶然性が合体した遊びです。私の場合、車で30分程度のところに、売り上げ日本一を誇る、「ジョイフルホンダ荒川沖店」があるので、3枚合板の4mm厚のシナベニアが入手できたため、製作がはかどり30枚程度のブーメランを1ヶ月程度で作れましたが、そうでない方は、3枚合板のシナベニアとして売られているもので、実は真ん中の層は実はラワンでできた合板を使い、削ったあとでラワンの中の導管の穴をパテ埋めなどして作ってみてください。手間はかかりますが結果は同じです。オーストラリアブーメラン協会のホームページでは航空合板というものが最適な材料として推奨されていますが、我が日本国では、英国のようにモスキートなどという合板作りの爆撃機を作った歴史なんぞないので、航空合板などは、巷(ちまた)で売られていたためしがありません。ロンドンの、王立空軍博物館に行ってみると歴史の違いが体験できます。(ちなみに川崎の5式戦も見れます)。
それから、ブーメランは子供に当てないように、広場に子供がいたら投げないようにしましょう。犬にはあててもいいですが、かまれないように先に自転車で逃げましょう。走っても勝てませんからHIHI。
それから、ブーメランは樹にひっかっかり安いので、「落とし棒」は必携です。軽い長めの物干し竿を持って、広場に行きましょう。ではまた。
7.私の49号の型紙
下記の平面形状の翼形を型紙にして両側の翼の端面の距離が290mmに成るように、シナベニアに鉛筆でなぞって、切り出してから、小刀で図4のような翼形になるように、全体の端面を斜めに削り取ってください。その後、120番程度の紙やすりで表裏も翼端もとにかくすべての面を滑らかにした後で、2倍程度に薄めた油性のニスを塗って、ニスが乾いた後で400番程度の細かい紙やすりで4回程度軽く表面をやすってなめらかにすれば出来上がりです。(330mmで50号機、240mmで
51号機になり、それなりに飛びます):風の無いところできれいに円を描いて戻ってきますが、風が少しでもあるとあおられて落っこちたり、とんでもないところへ、飛んでいってしまう、少々神経質なブーメランです。レーゲンスブルグの森の公園の林の中で飛ばしたらとっても気持ちよかったです。
図49
8.仮説:ブーメランの回転力が補われるわけ
ブーメランは直径30m程度の円軌道を回る間初めに述べたように100回程度回転しながら運動する。すなわち、移動量よりも回転する羽根の翼端の移動量のほうが極端に多いのです。それなのに、回って帰ってきたブーメランは、行き脚が止まってもまだまわっている。それはもう、どこかで回転するちからを補給しながら飛んでいるように思えてなりません。
図50
ブーメランが又を前にして、従翼を上にして飛んでる際に、5.2で述べた「翼上優先効果」によって下側の導翼は空気の速度が遅いので考えないことにします。上側になって飛んでいる従翼は図のように風をきりますが、翼の上の空気は翼の上をできるだけ短い距離で走り抜けようとします。そのために、pてんから翼の上に触った空気はそのままの高さをたもっているならばR点のほうへゆくはずのところ、Q点に捻じ曲げられながら翼の上を通過します。すなわち、ブーメランは風に対してαの力を与えたことに成ります。よって、ブーメランはαの反力として逆向きの力、図では半時計方向に、従翼を下に下げる力がはたらき、これが翼の回転をおぎなっていると思います。
図51
先ほどの図とは反対の姿勢では、当然反対の力がブーメランに働きます。しかし、この際にはブーメランが肩を先にして飛んでいるので、空気が上下に逃げやすく、翼の上を通過する空気が、先ほどの位置よりも少ないとかんがえられます。
仮説2: ブーメランの回転中心と重心には結構違いがあります。となれば、重心が回転中心よりも上に来るときは回転速度はおくれるでしょうし、その逆に下に来るときは回転が加速されるはず。であれば、ブーメランはくるくると等速でまわっているのではなくて、ぎくしゃくしながら回っており、これも上の現象をたすけているのではないか?なんぞと思いますが、私には証明のしようがありません。
また、回転中心と重心の違いは回頭運動に大しても抗力を発揮するはずです。
仮説1に記載追加:2007・3・9
b0050図の90度前の状態を描いてみたのがboo501です。この図の状態において、前方(左側)を飛ぶ導翼の上端においては空気は上側に捻じ曲げられるので、翼には下側の反力が働き、この力は翼を反時計方向に、すなわち回転を増すほうこうにブーメランを回転させます。一方、b0050図の右側の従翼においては空気は下側にねじれるので、翼は上側に持ち上げられる反力を得ます。そのため、こちら側従翼においても、翼を反時計方向に、すなわち回転を増すほうこうにブーメランを回転させます。ただし、この姿勢における従翼は、導翼の通ってきた軌道の上を飛ぶので、その効果は導翼のそれほど大きくは無いと想像されます。
さて、これと反対の姿勢を描いてみたのがboo502図です。この姿勢のブーメランは、エルボが上側になるので、一番対空速度の速いブーメランの上側にエルボがきます。エルボの上を流れる空気は図のように、上がったり、下がったりします。その結果、この姿勢ではブーメランはとくに、回転を補強されたり、その逆の力を空気から得ないでまわっていることになります。
以上の4姿勢、すなわち、boo50,boo51,b00501,b00502の4姿勢において、ブーメランに働く回転増速力のバランスを考えてみると、最初に説明したように、boo50とboo51はほとんどイーブンの逆方向,b00501とb00502では完全に501が増速ほうこうなのに、502はとくに力がかからない。よって、結局ブーメランは回転しながらまわるうちに、501の姿勢において、回転を増しながら飛んでいるということが判りました。(やったー)
ここで“はた”と、気が付いたのですが、私の造ったブーメラン40枚ほどのなかに、図boo503のように、導翼の端部を内側に曲げたものはみな、回転の低下が早く、帰ってきてももはやホバリングできずにスーと落ちてしまいます。それは図boo503のように、翼の受けるスラスト力が通常のブーメランと逆になるので、翼端のスラスト力と翼中央のスラスト力が喧嘩してしまうために、回転を補へ無いからだと推定されます。一方、図boo504のように、導翼の端部を外側に捻じ曲げた形状のブーメランは、単純なV型のブーメランよりも、両翼が上側に来た姿勢における導翼の端部の発生する回転増速効果が大きいことがわかります。ちなみに、このとき、従翼も外側に曲がっていたほうが従翼による回転増速効果もより大きくなることがわかります。私の作ったブーメランのうちで、50号機系列や、boo93として紹介したアドミ系列のものは、どちらも、目の前に帰って来た際に回転が持続し、そのために、揚力を保ちながらホバリング姿勢に入れるので、キャッチしやすく、また壊れにくい良いブーメランですが、これらは皆、両翼が外側に曲げられたboo504のような形をしています。
ブーメランが飛びながら回転力を補えるわけの仮説ーその2−追加記載2008年2月3日
boo6002.gif
先日、近くの公園でブーメランを飛ばしていたときのことです。近所の子供が飛ばしてみたいと言うのでブーメランを貸してやりました。しばらく遊んでいた後で、ちょっと飽きたらしく、そのこはブーメランの又に差し指を差し込んで器用にくるくると回して遊んでいました。(図BOOー601)それを見ていて私は、ベーメランが回転を続ける上で重要な項目を見落としていたことに気が付きました。図BOO-602のように、回転するものに内向力Fを与えてやれば回転は持続するのです。そして与えるべき内向力は回転中心の方向で、回転方向とは90度違う向きなのです。そうです、BOO-603図にへたなフラフープの絵を描きましたが、フラフープでは回転するトルクを補っているのではなく、あくまで内向力という力を補っていましたね。そういうわけで、ブーメランは少年の指先で回っていた時と同じように、飛びながら又の外側に向けた力を与えられて回転を続けていると考えられます。
さて、それではどこからそのような力が与えられるのでしょうか。図BOO-604を見てください。ブーメランは飛びながら翼を含んだ平面内を移動するので、平行な風を受けます。それは翼の効力となって、翼の前縁に垂直にかかってきます。ここで、翼の外側の抗力をPout、翼の内側の抗力をPinと書きましょう。翼はくの字に曲がった形状をしているので、又の空気は逃げ場が無く肩の空気よりも高圧に成っているはずです。特にブーメランが又を前向きにして飛ぶ瞬間は、又の間に多くの空気を取り込みますのでなおさらなはずです。したがって、PinはPoutよりも大きくなるので合力としてブーメランの重心Gをいつでも又から肩に向かって引っ張る方向に合力Fとなってはたらきます。
外に向かって広がった「くの字」型のブーメランが、内側に向かって翼の曲がった「Cの字」型のムーメランよりも回転しやすいのは、その形状のほうが多くの空気を又に取り込めるからではないでしょうか。
9.77号機(C型)、73号機(Ω型)、75号機(M型)が私に教えてくれたこと。図B0
これらの、3種類は、人が作っていない変わった形のものを作ってやろうと思って、3ついっぺんに作って飛ばしてみましたが、結果は同じでだめでした。どれも円錐を描いて半周ちょっと(3/5週くらい)して落ちてしまうのです。しかし、終わってみれば当たり前。これら3機種はどれも、翼の平面形がまるい形に近いです。つまり、仮に重心を中心に回っているとすると、重心まわりの円周方向の翼成分がどれもとても多いのです。C型にいたっては極めつけで、ホバリングしているとすると同心円の上を円形のものが飛んでいる。実際飛んでいるときの翼の軌跡を観察するとそのように飛んでいます。これではいくら回転しても、揚力がうまれてくるわけがない。だから、まだ高速ですっ飛んでいるうちは飛んでいられても、行き脚がなくなってホバリングに入ったとたんに、落ちてしまう。75号機(Ω型)も丸い部分がおおいです。75号機(M型)は少しはましかと思って何度もとばしてみましたが、ぜんぜんましじゃない。Mの真ん中のでこぼこをならして考えてみるとこれも相当に円周方向の翼の成分が多い。翼端はわりと放射方向の形ですが、たぶんその分を真ん中のでこぼこで空気が乱れる悪さが食ってしまっているんじゃないかと思います。以上学習したことをなかなか要求事項としてはまとめにくいのですが、とにかく「O,G、Cなど、重心に対して円周方向の翼の成分が多い翼形はホバリングできない。」と、言えそうです。
ブーメランの作り方(仕様要件)
ここでは、我々素人に作りやすい合板製ブーメランの作り方として、必要な要件をまとめてみました。
ブーメランは、どんな格好(形状)に作ってもとびますが、ちゃんと戻ってくるブーメランをつくるのには、形状に条件があります。
図
1.板圧:t=3〜6mm(推奨4mm):コメント、わたしのように、普通の成人には板圧11mmでは重くて投げにくいし、結果として戻ってくるほど、回転が与えられません。
2.翼長:ここでは「エルボ」の中心部から左右それぞれの翼の端までの距離を翼長として定義しています。それは(A1)図のl(エル)であらわされた寸法です。エル=160〜250mm(推奨200mm)。その結果、(A1)図の全長L=225〜350mm程度。コメント、小さく思えるかもしれませんが、作りやすい大きさです。それでも30mくらい向こうまで飛んでいきます。
3.アスペクト比(A2)参照:ここでは「片側翼長を平均翼幅で割った値」をアスペクト比と定義します。(飛行機の設計では「両側翼長を平均翼幅で割った値」をアスペクト比と定義します。その結果、飛行機設計学のアスペクト比はこのページのアスペクト比の2倍の数字になります。)。。。アスペクト比α=l(エル)/D。。D=(D1+D2)/2。。。α=6〜7。。。コメント1:アスペクト比がたとえば5.5などと、6よりも小さいと垂直急上昇ブーメランになりやすい。。。コメント2:アスペクト比は8以上でもちゃんと飛んで戻ってくるが、やや風に弱い傾向がみられる。
4.板厚比:ここでは板厚比は「翼厚を平均翼幅で割った値」として定義します。すなわち(A3)図において、翼厚7(イーター)=t/D*100(%)。。。7(イーター)は18%いかのこと。:推奨値12から15%。。。コメント:思ったよりもうすっぺらい方がよく飛びます。
5.翼断面形状:図(A4)で示したように、フリスビーのような表側の両端を削ったような形状がいいです。(私のようになまじナカ翼何番とか聞きかじった翼形はだめです、それは、ブーメランの場合、そのほとんどの部分が両側に対空気運動するからです。)
6.材質:材質は生の木でもラワンでもいです。飛ばすだけなら材質は問いません。問題は落ちたときの強度なのです。ブーメランは1個作るのに3時間くらいかかります。飛ばすと6秒程度です、普通の場合。ですので、一度飛ばして、落ちたらばらばらでは間尺にあいません。どうしても、なんども飛ばして遊びたい。そのためには「落下強度」が重要です。どんな方向で落ちても、強度があるシナベニア合板がよろしい。ところが、シナの木は原価が高いために、日曜大工店で売っているシナベニア合板のほとんどは、表裏の表面だけをシナの木で作りなめらかに見せて、真ん中の強度部分をラワンで作った合板が多い。これでもブーメランは作れますが、強度が落ちます。また、ラワンはその導管が表面にでてしまうために、ブーメランにしたときの表面がでこぼこになってしまいます。そのため、ニスやパテなどを何回も厚塗りして穴をふさごうとすると今度は全体が重くなってしまい、やっぱり戻ってこない。私の場合、ジョイフル本田荒川沖店で、4mm厚のシナベニア(3層全部シナ材)が入手できました。
7.中央部翼幅(De):最低30mm。。これも、落下強度の要求ですが、エルボの部分の幅(図(A5)のDe寸法)は30mm以上にしてください。この部分は、応力が集中するので、細く作るとすぐに壊れてしまいます。
8.中央部(エルボ)は他の部分よりも太くないとだめ:これもエルボ部分の落下強度からの要求です。図の(A6)や(A7)のような形状にならないように、形を決めてください。
9.翼端のうちすくなくとも一方は、重心から放射線方向の翼形状であること。(A8)図の右側の導翼の端部分は重心(G.C)から放射線(R.L)方向の形状です。こうなっていると、投げる際に、重心を前にしてブーメランが飛んでいく際に手離れが良く、飛ばしやすいです。その逆に、(A9)のように、円周方向の翼端形状だと、投げる際に指にひっかかって、足元の地面に激突してすぐ破損しやすいです。投げるのは、導翼でも、従翼でもよいので、どちらか一方がなげやすければよいです。
10.旋回抗力の検討。要求事項:ブーメランを山形に見た際の旋回軸の周りの中央部の外側の部分の面積が、全体の平面面積の50%以上であること。。。ブーメランの旋回力はコリオリの力に依存し、それは回転慣性に依存します。回転慣性は(A11)図の式であらわされます。また、回転抗力は最弱姿勢における、旋回(回頭)軸周りのモーメントですので、(A14)図の式であらわされます。その結果、(旋回抗力/旋回力)=(タウ2/タウ1)が大きければよいことになります。しかし、こんな積分をいちいちやっているわけにもいきませんので、代用としてこうします。ブーメランの平面形状を仮にきめたら、その両翼が水平線に接地するように、図の上で置きます。(A10)図参照。そこで、エルボの最も水平線から高い場所の高さをhとして、その半分、3/4、1/4の水平な線を引き、図のハッチングした中央部以外の部分、すなわちAeと記号をつけた部分の面積が全体の半分以上になるようにします。もし、そうならないようであれば、ハッチングしたAcと記号をつけた部分を細くしてやります。あるいはAeの部分を太らしてやります。
11.挟み角は80〜90度:図(A12)のシータを80から90度でつくりましょう。これも旋回抗力の関係の要求です。
12.平面形状の最小RはR10mm。(A13)図のRで示した形状です。まず第一に端っこがとんがっていると危ないです。また、空気抵抗の面からこのましくありません。またへこみ部分が小さなRですとそこの応力が集中してしまいそれも良くありません。
13. 板の比重は0.52g/cm3ならOK.。0.67g/cm3では重すぎてだめ。経験則なのでその間は判りません。比重の重いブーメランはどうゆうふに削っても途中で落っこちてしまいます。板を買ってきたら、10cm角に切り取って重さを試しに量ってみましょう。2008.2.9本項記載追加
まとめ:以上しめしたように、お土産でない飛ばしブーメランはだいたい上記の仕様にしたがって作られていることがお分かりいただけたと思います。
Boo93
BOO93:図93
記載追加:2007.2.12:改善提督帽の提案:「ブーメランは調整が必要ダー!」
まず図Boo93を御覧ください。これの(A)で示された実線がアドミラルズハット(提督帽子)と呼ばれるブーメランの形です。この形をオーストラリアブーメラン協会のホームページの写真からコピーして2枚作りました。それらはとても良く飛んで、目の前でホバリングして降りてきてくれるのでキャッチもしやすくとても良いブーメランでした。そのうち1枚を、強風の時に無理をして投げて壊してしまったので、再生しようとして、3枚作りましたが、どれも図20(BOO20)に示したような「急上昇Me163」タイプになってしまいました。同じ寸法、同じ材料で作ったのにどうしてでしょうか。あるひ、ためしに、いろいろな位置にボール紙のタブをビニールテープで貼りつけているうちに、図の(B)の点線のようなボール紙を「表面」につけると、「吊り上り」の傾向が無くなって、おとなしく「円錐軌道」を描くことを発見しました。(昔の人は試しにいろいろやっているうちにいろいろ発見したものでした。ピサの斜塔から鉄球を落とすなんて危ない実験に立会いたかったものです。ボローニャ行きましたよ。)又の部分の張り出し幅は30mm、全体の大きさ(=両翼端の距離)は33cmです。これは、「ブーメランの仕様要求」の10項でのべたように、回頭抗力を増すように、回答中心から遠い部分(Ae)の面積を増やしたからと解釈されます。
ブーメランは木の板をナイフで削ってつくります。木の板は、同じ1枚の合板でも部分、部分で比重が違います。それを同じ型紙で鉛筆で形をなぞって、ジグソーで切りますが、鉛筆型のプラマイ1mmはジグソーはふらふらしながら切って行きます。また、翼端の削り方は「目分量」でやるので、そのつど変わります。そんなわけで、同じように作ったブーメランも、その都度出来が違うのです。その結果、よく出来たはずのブーメランが、まったく飛ばずに地面にツッコンでしまう「悪い癖」がぬけなかったり、良くないはずの寸法のブーメランが以外に良く飛んだりします。そんなわけで、ブーメランは作った後の調整が必要です。ちょうど中間周波のIFTの調整とおんなじです。
もう一度、図Boo93を御覧ください。そこで、図の(C)の形状の型紙を作り、厚さ4mmの合板になぞって、3枚同時に作って、飛ばしてみました。
そのうちの1枚は、回頭が遅れるために、「最遠方において揚力が不足して地面にツッコン」でしまいました。それで回頭を早めるために、(D)のラインで削り、ためしに飛ばしたが「いまいち」だったので(A)のラインまで削り、良いブーメラン(円錐軌道が描けるブーメラン)になりました。
次の2枚目は、つくりっぱなしの(C)のラインでちょうど良い軌道だったのでそのままでした。
3枚目は、1枚目と同じく(A)ラインまで削っても、「つっこみ癖」が抜けなかったので壊してしまいました。
かくのごとく、ブーメランは調整が必要なのですから、調整代を持った形状Boo93を提唱するものです。
**************************************************
追加記載:2007.2月22日:ダイヘドラル加工の意味:英国ウットクセッターにて考案した。
まず図101をご覧ください。ブーメランBが矢印の方向に、円錐運動をしながら飛んでいます。円錐の頂点をO、円錐の半径をrとします。ブーメランBを含む微細な平面をPとし、Pは簡単に考えるために、正方形であるとします。さて、このブーメランがほんの全長の半分だけ進んで、図102におけるP1からP2に移動したとします。この際、ブーメランを含む平面Pはブーメランの全長Lの半分だけ進んだので、そのぶん回頭していますから、平面P2は平面P1に対して同一な平面にはなりません。そのためP1とP2を含んだ軌跡はDという厚みを持ちます。このためブーメランBは常に、円錐運動中にある厚みDをもった空間をかき回しながら、進まねばなりません。ところが、図103のように、もともとブーメランBがうわむきに反った(そった)形をしていたならば、進行しながらブーメランBがかき回す空間が小さくなってずっと空気抵抗が減るはずです。
すなわち図104のダイヘドラル加工がそれです。このため「翼端に適度な上向き傾斜を持たせる加工すなわちダイヘドラル加工をほどこせば、円錐運動中の空気抵抗が低減され、投擲者への帰還を容易ならしむ効果を得。」というのがダイヘドラル加工の効果です。さてこのダイヘドラルの大きさの実際を計算してみましょう。図105において、ブーメランがその全翼長の半分進んだときの距離(=1/2L)はブーメランの円錐半径=rに対して中心角シータだけ後の場所なので、(円弧の長さは、円の半径かける円中角度の関に等しいという法則を当てはめて)___θr=(1/2)L___です。同時に、θタかける(1/2)Lはd___ですから、その両式から、___d=LxL/(4r)___を得ます。よって、33cmの長さの円弧半径30mのブーメランの場合には、ダイヘドラルしろは約1mm(0.9075mm)になり、翼厚さ4mmの半分弱を削るというきわめて体験的な削り代が得られます。
***************************
記載追加6JLY07:ついに解明した「よく飛ぶブーメランの秘密」
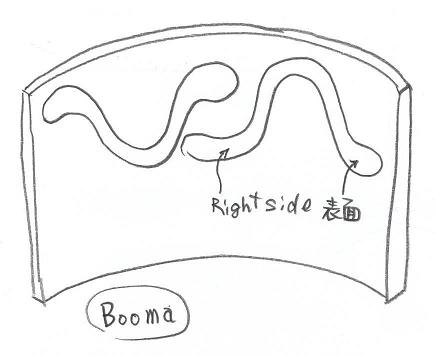
日曜大工店(いわゆるドーイトのお店)でブーメランの材料のシナベニアを買うときに、しばしば、図(BOOMA)のような曲がった板しかなくて、「なーんだ、これしかないのか、売れのこりだな、やだなー。」とか思ったりするでしょう。これは間違いです!日曜大工店で曲がった板があったら、よだれをたらしてかうのです。そして、図(BOOMA)のように、「裏側に凸」いいですか、も一度いいます、「裏側に凸」ですよ。こうして、ブーメランをつくるのです。そうすると良く帰ってきます。地面に急落下しにくい、良いブーメランができるのです。そうして作ったブーメランは、表を上にして、机に置くと、シーソーみたいにグラグラします。また、裏を表に机に置くと、私が腕と呼んでいるブーメランの真ん中が浮き上がってそこを押すとぶかぶかします。それでいいのです。---------------------------------------それから、これは本当に秘密なんですが、たとえば飛ばないブーメランが在ったとして、3分ほど水に浸して、水をしみこまして、窓の枠に貼り付けにして、そのとき、もう一度言いますが、「裏側に凸」にして、洗濯バサミなんかで貼り付けにして日光乾しにすると、見違えるほど、よく帰ってくるようになります。
*************************************************************